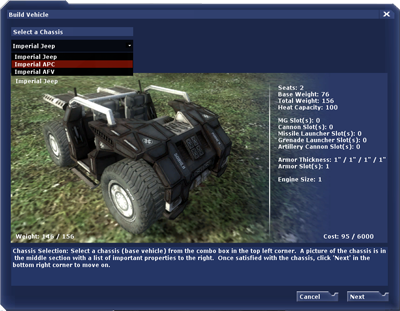
The Chassis Selection Screen.
Vehicles can be built customized to meet specific needs. There are four major components of a finished vehicle:
- The chassis
- Mounted weapons
- Armor plating
- An engine
To open the Chassis Selection Screen, press "v" (by default) whilst in the Vehicle Factory or go to the Vehicle Building Interface (which can be found in the Vehicle Factory), and press the USE key.
To customize your vehicle, click the "customize" button after selecting a chassis from the drop down menu on the main factory screen and clicking "next."
Vehicle Customization
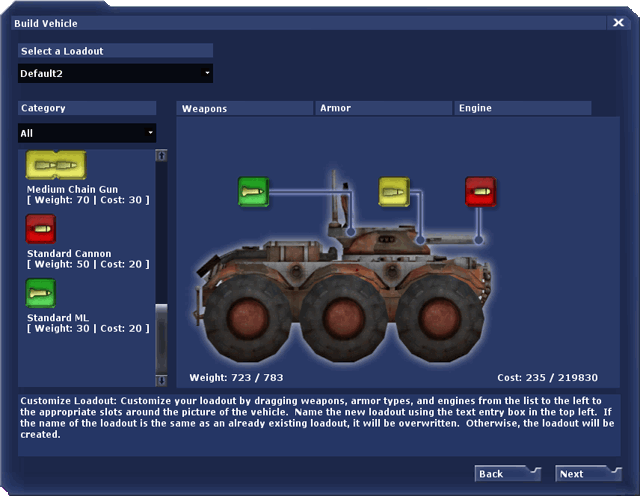
The Weapons Customization Screen.
The first screen you see after clicking "customize" is the weapons customization screen. The background image is of the chassis you have chosen to customize. Also visible for most vehicles are colored boxes in which weapons are placed. The color coding works like this:
- Red Boxes indicate that the vehicle can mount tank cannons.
- Yellow Boxes indicate that machine guns can be placed in the slot.
- Green Boxes mount missile launchers.
- Grey Boxes correspond with grenade launchers.
- Artillery cannons are marked by Orange Boxes.
On the left of the screen is a list of the weapons that have been researched. To mount one of these weapons on a vehicle simply drag it from the list, and drop it into one of the color coded slots. To remove a weapon, drag it out of the weapon box.
Armor & Engine Customization
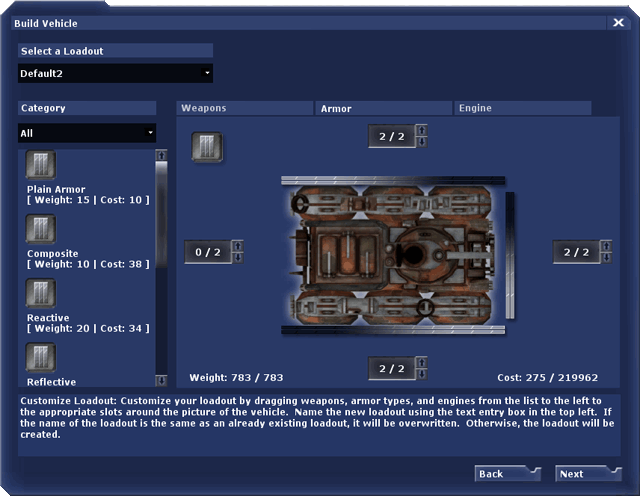
The Armor Customization Screen.
Clicking on the armor tab of the customization screen will bring you to the armor page. The layout of this page is much the same as that of the weapons page, except here armor types have replaced the weapons.
You can add armor plating to any side of the vehicle by clicking the corresponding arrows. The numbers next to the arrow tell you how many
plates of armor will be placed on the vehicle out of the maximum number of
plates. As with weapons, the more
plates of armor you add, the more your vehicle will weigh.
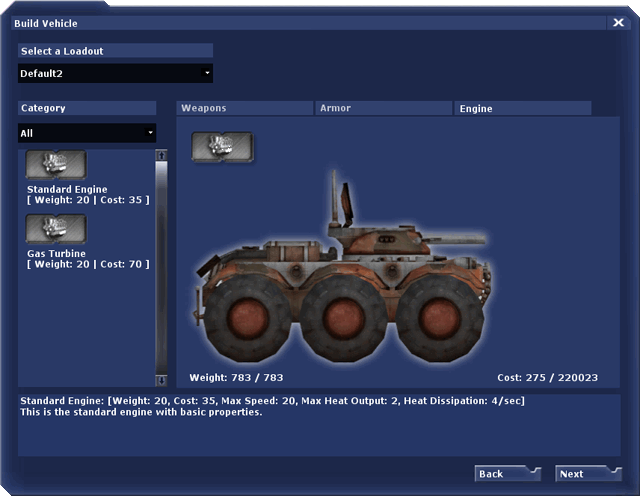
The Engine Customization Screen.
The next tab is the engine page, which allows you to choose from different types of engines. Some engines may be fast, but will easily stall when damaged. Others may have superior cooling properties, allowing you to fire weapons for longer.
Weapons Grouping
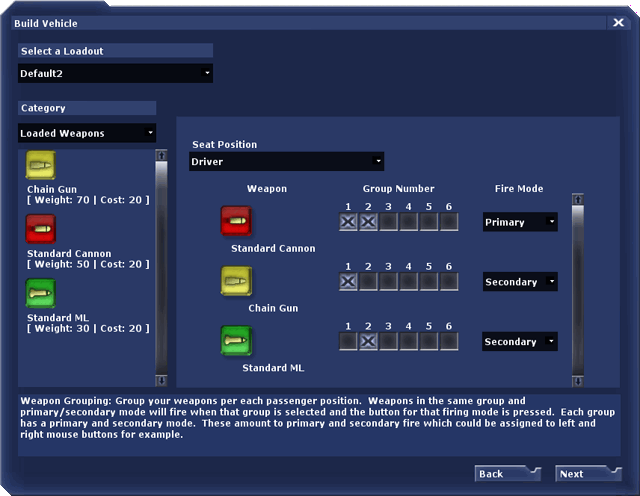
The Weapons Grouping Screen.
Clicking next brings you to the weapons grouping page. Here you can decide how you want your weapons to be configured, and what buttons you want to use to fire them.
You can have six basic weapon groupings on each vehicle. Each weapon can be placed in a group and each group can be called upon by using the keyboard numbers 1, 2, 3, 4, 5, and 6 (much like switching weapons as a soldier). To place a weapon in a group simply check the box that corresponds with the number of the group.
In addition, each weapon can be set to shoot with your primary or secondary fire buttons (Mouse buttons by default). If you have two weapons in the same group and have set both as primary (or secondary) fire, you can fire both of them at the same time.
Be aware though, that firing too fast will cause your vehicle to overheat. It will not be able to fire or move while overheated.
The Loadout Entry Box.
When you are done customizing your vehicle, you may choose to save the loadout by typing in a name in the top left text entry box. If the name of the loadout is the same as an already existing loadout, it will be overwritten. Otherwise, the loadout will be created. A few basic loadouts have been created for you. While handy, these may not always carry the newest researched technology. If you have the research and the resources, always customize your tank.
You are also able to recustomize your vehicle at a Repair Station (See Structures Appendix) by driving onto it, going to the vehicle build GUI (V by default) and selecting your new loadout. You will pay the difference between the two loadouts and even get a refund if your new tank design is worth less than the old one. The vehicle build GUI will list the difference between the two loadouts as the total cost. Armor repair levels will be set to 0 as a penalty. You can also refil your vehicles ammo at Repair Stations.